Hello Guys, it's been a very long time since I updated my blog. I am currently settling in Canada and looking for arts and crafts stores that sells polymer clay products and accessories. It will be for awhile when I will be featuring my new projects so please be patient and please feel free to post your questions and I will answer them as best that I can.
Hope to hear from you.
Monday, December 5, 2011
Thursday, September 1, 2011
Missing you all
Hello guys, I still can't post my new projects as I am preparing to move out of the country. I never thought that this will take much of my time preparing for the big event of our lives. All of my polymer clays and tools are packed and could not post my new designs. Hopefully I could post them here soon. Thank you for visiting and please don't forget to check in once in a while.
Tuesday, July 5, 2011
Hello guys! I know it is such a long time since I updated my blog. I have been busy this past months as my family and me are preparing for a biggest change of our lives. We will soon be moving to a different environment and I am hopeful to find and meet new wonderful friends. I am hoping that I will soon be able to attend polymer clay arts gallery and workshops in this new place that we are about to live in. As soon as we are settled in, I'll try my best to come up with beautiful art pieces and jewelry designs. So I hope you bear with me and keep in touch from time to time. For more of my Jewelry design, you may visit my Facebook "Pinkcatdesign PC".
Thank you for your patience.
Thank you for your patience.
Friday, June 10, 2011
Miniature Pond

When I was in grade school, my family and I went to my father’s hometown during summer vacation. It was a long ride from the city and I never find it boring. In fact, I would sit near the window side of our car and watched the wonderful scenery as we passed by. I never wanted to sleep along the way. Living in the city, where tall buildings and cars are all you see; it was quite refreshing to see flock of birds flying, cows resting on the fields, ducks, geese, swans taking a bath on a pond, the smell of fresh air, the sound of gravel as you walked by and at night time, you see these fireflies dancing around. These are the things I will not trade for money. Too sad that I never had that experience again since. So, I decided to make my own pond with two lovely swans and two frogs. I looked at this miniature pond whenever I feel sad and it somehow reminds me of my wonderful experience I had as a kid. Why don’t you create a miniature representation that will remind you of something wonderful you have experienced.
Thursday, May 19, 2011
Fire Cane
Here is my new tutorial and it is now available for download at http://www.claylessons.com/tutorial/fire-cane.


In this tutorial you will find two techniques of making a fire cane. I have also included one very useful tool and lots of ideas. So start making your own fire cane and use them to design your very own jewelry and other things you can think of.


Flower Cane
 |
| Here's my new free tutorial. Just click the picture to view the steps in making this simple cane. |
Wednesday, May 18, 2011
Making your own tool
I have been looking for objects I can use for my projects and I found lots of things around the house that I could use. For instance, my sewing needle. I used this to add texture to my art pieces or use to drill holes for delicate projects. Since I have been using this a lot, I decided to enhance this sewing needle and make it more easy to use. I want to share this with you and I hope you'll find this very useful.


Thursday, May 5, 2011
Green Is In my blog
Hi! I have added two necklaces in my gallery. Please tell me what you think of it. :)


How to soften dry, crumbly clay
Hi! It's quite awhile since I updated my blog. I have been feeling a little ill these past few days maybe because of the weather. It is so hot and humid here and I am a bit worried that my clay will harden before I could work with them. Some of them already turned crumbly and hard to work with. It is a good thing I still have some clay softener to get all those clay workable. I also use some baby oil, mineral oil, others used olive oil to soften it. It is never easy to condition hard, crumbly clay. It needs a lot of patience and a strong hands. So what you should do when you have a dry, hard to knead clay?
First, I cut the dry clay into bits of pieces. Next, I drop some baby oil or clay softener into the pieces of clay. (Be sure not to add too many oil or softener into your clay because once absorbed, it will be too soft to work with). Then, I let it sit for a few minutes, after that, I knead them with my hands. I do not suggest you get it straight to your pasta machine as this will make your dry clay crumble into pieces as you run them. Just roll them in the palm of your hands to allow it to bind together plus the heat from your palms helps softens the clay. You may even cut them to pieces from time to time and roll them back again. You can also knead them in divided portions, once conditioned you can combine them into one. It will be much easier to knead and condition if you divide it into smaller portions. Once the clay binds enough together, you can now run them into your pasta machine at the thickest setting until it is well conditioned. If by accident you put too much oil in it and it is too soft to handle, you can leeched them by placing the clay in between two, clean white paper and place it under a heavy book or its' equivalent to help press it. Allow your clay to leeched for a few hours or a day depending on how soft your clay was but be sure to check on it or else you go back trying to soften it again. I hope you find this helpful. Have fun!
First, I cut the dry clay into bits of pieces. Next, I drop some baby oil or clay softener into the pieces of clay. (Be sure not to add too many oil or softener into your clay because once absorbed, it will be too soft to work with). Then, I let it sit for a few minutes, after that, I knead them with my hands. I do not suggest you get it straight to your pasta machine as this will make your dry clay crumble into pieces as you run them. Just roll them in the palm of your hands to allow it to bind together plus the heat from your palms helps softens the clay. You may even cut them to pieces from time to time and roll them back again. You can also knead them in divided portions, once conditioned you can combine them into one. It will be much easier to knead and condition if you divide it into smaller portions. Once the clay binds enough together, you can now run them into your pasta machine at the thickest setting until it is well conditioned. If by accident you put too much oil in it and it is too soft to handle, you can leeched them by placing the clay in between two, clean white paper and place it under a heavy book or its' equivalent to help press it. Allow your clay to leeched for a few hours or a day depending on how soft your clay was but be sure to check on it or else you go back trying to soften it again. I hope you find this helpful. Have fun!
Thursday, April 28, 2011
Simple Hollow Bead Project
A Meteorite Bead
Here is my latest free tutorial, how to make a hollow bead using styrofoam and aluminum foil. With this tutorial you can make your own meteorite jewelry, charms or an additional item to your science collection project. Just click on the picture.


Wednesday, April 27, 2011
Winning color combination
Hello,
Last week, I posted a poll below my blog page about which color goes well with red. My options were orange, white, blue and violet. The winning color goes to white, with three votes against orange with 2 votes. First I'd like to thank those who took time to vote. I really appreciate it. It is red and white then and so I made a simple jewelry with that color combination. Here it is...
Last week, I posted a poll below my blog page about which color goes well with red. My options were orange, white, blue and violet. The winning color goes to white, with three votes against orange with 2 votes. First I'd like to thank those who took time to vote. I really appreciate it. It is red and white then and so I made a simple jewelry with that color combination. Here it is...
 |
| I used skinner blend technique here to form this elegant red and white beads. |
 | ||||
| This is a twisted earrings. |
Sunday, April 24, 2011
Pink Cat Design: Free Tutorials
Pink Cat Design: Free Tutorials: "Here is my first free tutorial and I hope you'll like it. Curtain Tassel and More!"
Friday, April 22, 2011
How to apply future polish on your clay art pieces
I have used different kinds of glazing liquid on my clay pieces, each of them gave me different results. When I first used the future polish (in our country it is called "Pledge wipe and shine" floor polish) I didn't like the way it turned out. That's because I was applying it the wrong way. At first, I used cotton buds and soft bristle paint brush, dipped into the liquid and applied it on my art pieces. It gave me that shine but with the mark of strokes from applying the liquid with cotton buds and soft brush. So what better way to apply it? Well, I thought of pouring some of the liquid into a bowl and immerse my clay art pieces. I used dry tip cotton bud and dabbed excess liquid lightly without rubbing it off and dried it with a hair dryer at the lowest setting by moving the hair dryer to and fro against the clay. It turned out wonderful. Here are some samples of my experiment.


Thursday, April 21, 2011
Frame pendant
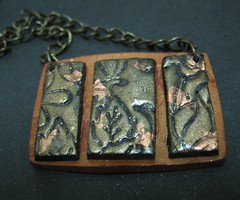
I use my flower stamp into the black clay, dab some of my old eyeshadow and some copper metallic leaf. I cut it in three parts and make it look like a wall picture frame.
Forgotten things may turn into a piece of art
 |
| White doted flower with coconut shell beads necklace |
I have these coconut shell beads sitting in my bead box for a very long time. One day, as I went through my things, I saw these wonderful beads. I sat in my chair for quite sometime holding my bead box and thinking of how can I use these for my clay jewelry? So I looked inside my polymer clay art pieces organizer and saw this green flower pendant I made which was also sitting for quite awhile in my organizer, and I just thought, since they are both sitting around why not combine them. So I did. So glad that I do not have the habit of throwing things away. Things that we may thought have no use at the moment may actually be useful someday and may make a wonderful piece of art.
Wednesday, April 20, 2011
Pink Cat Design: Tutorial

Tuesday, April 19, 2011
About translucent clay
Hi! I recently joined a forum about polymer clay. I was overwhelmed at how many great clay artists that are responsive and willing to help to anyone. I recently post a reply on translucent clay. I suggested on immersing it in ice water, (by the way, ice water here in our country means ice that are still in water form but cold enough) to make it more translucent. I learned this concept of immersing in ice cold water in some article I have read, and too bad I didn't save the article. I tried it anyway and I was happy with the result. Anyway, someone replied to my post and she gave me a wonderful insight to think about. She said that immersing a hot clay in ice water may crack your pieces. She also said that there is no difference. I just want to say you might want to make a little experiment on that or consider the advice I receive from the forum.
Monday, April 18, 2011
Summer is definitely here!
 |
| What a wonderful time to relax on a beach, showing your sexy skinny body in a swimsuit. What do you do to accentuate your get up? Why not accessorize yourself? Here are some simple yet striking necklaces to compliment your bod. |


Thursday, April 14, 2011
Which type of clay should I use?

Sculpey III
These clays are available in at least forty different vibrant colors. They are easy to work with and has a matt texture effect once baked. Sculpey III can be easily burn so watch carefully when baking. I used these clay when I want a marble effect on my projects. I usually mixed it with other brand. The softness of sculpey III makes my marble achieve its' design. If you used sculpey III alone it tends to crack when you drill them so it isn't quite good for jewelry making.
Studio by Sculpey
These clay are available in 2.8 oz per pack. I love the colors of studio by sculpey, once baked they retain its' color and even brighter, you may want to add translucent for a mild color effect. It just so sad that these brand is going out of the market (So I heard.). Studio by sculpey has just the right amount of softness and it is easy to work with.
Premo
Premo is one of my favorite. These are great for making canes and delicate projects. It is quite flexible and does not break easily especially if your making projects that has thin areas in the design. Premo has a glossy effect after baking. I used Premo for my jewelry projects.
Fimo Classic
Another favorite of mine is Fimo. Fimo is great for caning and detailed art work. It has a rich vibrant color after baking and is durable and firm. Great for making semiprecious stones like jade and amber by combining small amount of opaque colors with large amount of translucent. The black clay is just superb, it does not stain your hands while you condition it or stain lighter colored clay when you reduce them or cut your canes. Fimo classic is flexible after baking and resists cracking. I definitely recommend Fimo.
Kato
These clay are firmer than fimo. According to experts, these clays are the stronger, flexible and does not change color. It comes in 21 colors so far I have used the translucent clay.
Cernit
Cernit is usually used in doll making for its' porcelain-like effect. It is easy to work with, quite sticky and softens easily. I tried using the gray color and it gives me a dark tone after baking. They are strong and durable great for making projects that requires tension and be handled a lot like necklaces, bangles, buttons and among others.
Super Sculpey
Available only in pinkish tan and is used by most doll makers. Can darken if baked too long. You need to condition the clay properly or else you get uneven blotches, small white bubbles and irregularities after baking.
I tried sculpting a baby sleeping, it looks great before I bake it, then after curing small patches appear on the surface of the clay and it completely ruined my projects.
Well, here are some of the guide to which clay you should use and when to use it. If you want to learn more, I suggest a book entitled "New ways with polymer clay" by Kris Richards, "The complete book of polymer clay" by Lisa Pavelka, and "Making polymer clay Jewellery" By Sue Heaser. They have lots of tips and guidelines in the book.
Monday, April 4, 2011
How to care for your clay jewelry
How to care for your clay jewelry
How can you make your polymer clay jewelry lasts long? Here are some tips:
1. Avoid placing them in direct sunlight, appliances, furniture like wood table tops and certain kind of plastic as this may react to your clay pieces.
2. Never use jewelry cleaners on them, if your polymer clay jewelry is accompanied with metal, try not getting it onto your pieces by covering them with plastic while cleaning the metal.
3. You can restore shine on your pieces by buffing them with a lint-free cloth or you can apply a small amount of future floor polish. Never use nail polish this may make your pieces sticky.
4. All metal tarnishes overtime to prevent progression, store your jewelries on cloth jewelry bags and avoid storing them in high humid area.
5. You can clean your pieces using soap and water, avoid getting it onto metal. If water gets into the metal, try to dry them out completely before storing them.
If you have a questions, something to add and comment about these blog, please feel free to post and I'll try to answer them.Thanks!
Thursday, March 31, 2011
Snake skin bangle

Here is my latest project, if you would like to learn this technique please visit http://www.claylessons.com/gallery and please don't forget to vote. Thank you.
Wednesday, March 30, 2011


Saturday, March 26, 2011
Stone texture effects

Friday, March 25, 2011
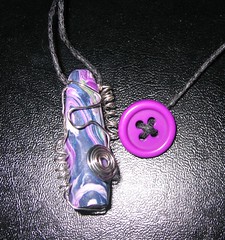
Button
I just learned that wire wrapping is one way to enhance your clay projects and it makes a good jewelry design.
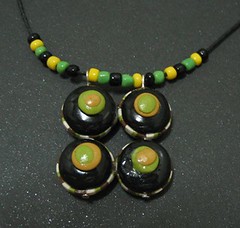
Egyptian Inspired necklace
I really love this egyptian inspired necklace, the colors are blending well and it is it gives me a sense of calm.
Thursday, March 24, 2011
 |
| Black and white are the colors that never goes out of style. |
 |
| Encapsulated beads. I have these three leftover flower canes and I didn't know what to do with it, until I had an idea to turn it into a bracelet encapsulating it in resin. |
 |
| Three of Kind. These beads are made from the ends of a cane. |
 |
| The Black pearl |
 |
| Green Marble |
 |
| White spot butterfly |
Tuesday, March 22, 2011
Cute little things to keep
Cute Little things to keep

Here are some of the things I made last Christmas to give to my friends. Some of them I turned into an earrings, pendants and keychains.
These are easy and fun to create. I’ll be writing a tutorial about some of these cute items soon. Please feel free to post which of these cute items you particularly want me to write a tutorial. Here's the link where you can download the file. https://docs.google.com/viewer?a=v&pid=explorer&chrome=true&srcid=0Bw02Um4xOQZmNDFjMDA1YzAtOTMxYy00ODUyLTg4NGEtMWQ0N2VlYTI3NTYz&hl=en&authkey=CPv9x-UH
Subscribe to:
Posts (Atom)